Purpose: Understanding of voltage-control principles will be further developed through applying these concepts to the Yamaha AN1x Analog Physical Modeling Synthesizer by creating four original voices. Basic knowledge of the Macintosh, MIDI Time Piece, and Galaxy software will also be gained through storage of these presets to disk.
Preparation:
1. Patch audio at your station.
Using two quarter inch cables, patch the stereo outputs (L/R) from the back of the AN1x to the2. Patch MIDI signal.
ProMix inputs 1 & 2 on your patchbay. This defeats the NORMAL from the W5 synthesizer to the
mixer. Now faders one and two on the ProMix will be controlling the audio coming from the AN1x.
The AN1x has a keyboard, so you do not need to control it from the W5 as you did
the Proteus module (although it is possible to do this). You will, however, need to
have MIDI communication between the AN1x and the computer so that you can
save your work to Galaxy.
a. Using a MIDI cable, connect the MIDI OUT of the AN1x to the MIDI IN port on the front
of the MIDI TIME PIECE.
b. Using a MIDI cable, connect the MIDI OUT on the front of the MIDI TIME PIECE to the
MIDI IN port on the AN1x.
Notice how the MIDI input and
output are labeled on the front of the MTP.
3. Reset the AN1x to its default factory settings.
a. On the AN1x numeric keypad (program change keypad) turn on the power while holding
down numbers 7, 8, and 9. Hold the buttons down until you see this message appear in
the display: "Fact Set? [1-9].
b. Press "9" on the numeric keypad. The window will change to show you that the option you
have selected is "all". This means all memory banks will be restored to factory values,
replacing anything currently in memory.
c. Press the "yes" key to confirm your choice.
Check It Out:
Take a moment to listen to some of the
factory sounds. The normal "Play" mode of the AN1x is
the "ASSIGN" mode. This button
is located just to the left of the display.
a. The name of the first voice,"Relaxx", will appear in the display.
b. There are 128 voices in the AN1x. You can select other voices by using the " + and - "
buttons, or by typing a number on the numeric keypad, then pressing "Yes/Enter" (the +
sign).
c. Be sure to see what effect the "Pitchbend Wheel", "Modulation Wheel", and
"Ribbon Controller" have on each voice.
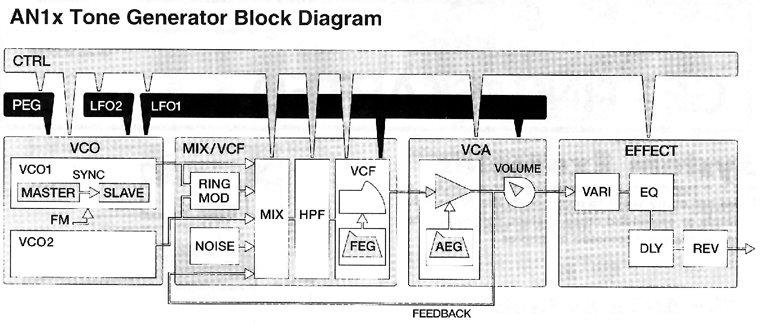
Review: The architecture
block diagram of the AN1x:
Procedure for creating a "VOICE":
Task: Initialize a voice
1. It does not matter which voice is selected. All initialized data is placed in the
"Edit Buffer". Only when you actually store the data, will one of the 128 memories actually
be overwritten.a. Be sure the tan "Assign" button is selected and enter "130" using the numeric keypad, then confirm by pressing "Yes/Enter".
b. You are then asked if you want to initialize ("Init") the voice. Select "Y". (yep!)
c. You are given a choice of ways in which the AN1x will initialize the memory, depending on what kind of sound you are trying to create. The choices are:1 - Normal (all settings normalized)
2 - Bass
3 - Brass
4 - Strings
5 - E.Piano
6 - Organ
7 - Sync mono (for solo lead type voices)
8 - PWM (for pad type voices)
2. Select "1", then confirm by pressing "Yes/Enter".Important: Think about the operational concept. For most tasks, you will choose the module or controller by pressing a "KNOB PARAMETER GROUP" button. Then you will use the 8 "ASSIGN" knobs to change the parameters.
Task: Select the Waveforms for the
two Oscillators
1. Press the "VCO1" button in the knob parameter group. Notice that the lettering on the dark blue "VCO1" button is green. Look at the assign knobs. All the controls that appear as green letters on a dark blue background are now active.
2. Select "saw2" for the waveform (Assign 1 Knob). You have just assigned the "saw2" wave
to be generated by VCO1.
3. Check the initial value for "EDGE" (Assign 4 Knob). This slightly rounds off the edges of the waveform (a crude filtering before we get to the filter!). Do this by pressing down on the top of the "ASSIGN" knob labeled "EDGE". Turn the knob back and forth and listen to what happens.
4. Set the "EDGE" parameter to maximum.
5. Press the "VCO2" button in the knob parameter group. Notice that the lettering on the dark blue "VCO2" button is brown. Look at the assign knobs. All the controls that appear as brown letters on a dark blue background are now active.
6. Select "pulse" for the waveform (Assign 1 Knob).
7. Set the "EDGE" parameter to maximum.
8. If you try to listen to the effect of the "EDGE" control on "VCO2", you will not hear anything. The AN1x defaults to having the gain turned up on only "VCO1". We can fix that.
Task: Adjust the relative volume
levels of the two oscillators
Look at the block diagram of the synthesizer at the far right.
Check out the "MIX/VCF"section.
Look at the middle of the "MIX/VCF"portion of the diagram and you will see that there
are five audio signals entering the filter. They are:1. VCO1 Except for FEEDBACK, the relative volumes of all these audio sources are adjusted at the
2. RING MOD
3. VCO2
4. NOISE
5. FEEDBACK (coming from the VCA and controlled at the VCA).
"MIX/VCF" module.
All you need to be concerned about are VCO1 and VCO2.1. Play a note and listen to the timbre of SAW2.
2. To adjust the volume of VCO1, press the "MIX/VCF" button (this is a green button.)
3. Find the assign knob that controls the level for VCO1 (what color was the "MIX/VCF" button?). The green buttons to the right of each "ASSIGN" knob are now active.
4. Set the volume for VCO1 to "0".
5. Find the assign knob that controls the level for VCO2 and set it to "127". Play the same note as before and compare the timbre to the SAW2 that you just listened to.
6. With VCO2 level at maximum, slowly bring the VCO1 level up from "0" to "95". You will probably not hear much of VCO1 until the parameter numbers gets into the 50s. Turn the VCO1 level control back and forth quickly and hear how the timbre changes. This is why you will often create a voice from more than one oscillator (remember "wave mixing" in your text?). You end up with a waveform that is different from either of the ones you started with, but has characteristics of both.
7. Reset VCO1 level to "95".
Task: Name the "VOICE". Now
you get to work with the controls on the right side of the synthesizer.
1. Look at the control matrix on the right side of the synthesizer look at the names of the parameters on the second line from the top. At the far right end of the row is a parameter called "NAME".2. Using the "EDIT ROTARY" switch to the left of the matrix, set the pointer to the second line. Now all the features on that row are available for control by the up/down value switches at the bottom of the matrix.
3. Press the "UP" arrow beneath the word "NAME". In the display, the first letter of the voice name ("INITNORMAL") will being to flash.
4. Look back to row two of the control matrix and find the parameter "NAME" again. The parameter to the right of it is labeled "CHAR".
5. Go to the up/down value button beneath the "CHAR" parameter and press the up arrow. Notice what happens in the display.
6. Hold the button down and watch the characters "scroll".
7. Go back to the up/down value button for the parameter "NAME" and press the "UP" button. Notice in the display that the second character of the name is now highlighted and may be changed.
8. Press the "DOWN" button and notice that once again the first character is highlighted.
9. Using the above commands, rename this voice: "BuzzyB-Your Initials" (BuzzyB-BW). You must use the upper and lowercase letters as shown (in other words, don't use all uppercase or all lowercase letters).
10. When you have finished entering the name, press the "YES/ENTER" button on the keypad to confirm your name.
Task: Save this "VOICE" to a memory
location in the AN1x.
1. You will find the "STORE" button just to the right of the numeric keypad. Press it. The word "STORE" now appears in small letters at the bottom of the display.2. You now must choose the location in which to store the voice. You do this by either using the + and - buttons to change the location, or typing a number using the keypad, and confirming that by pressing "YES/ENTER".
3. You will store this first voice to location "001".
4. Press the "STORE" button again. The screen will flash "SURE? Y/N". It's giving you a chance to change your mind.
5. Press "Y". You have now store this exciting voice to memory location "001".
Applying What You Have Learned
Task: Store the voice you created to location "002".
1. Using the techniques you have already employed, store "BuzzyB" to location "002".
Task: Rename the voice that is now
in location "002".
1. Name the voice in location "002": "VCA EG-Your Initials". Think about what you have done. You now have the same voice store in two different locations, but with different names. You have done this because we are now going to edit voice "002", but wish to keep the first version unaltered in location "001".
Amplitude EG Experiment
Task: Create a new EG shape for the
amplifier
1. Be sure you have voice "002" called up.2. Press the "Knob Parameter Group" button named "VCA" (It's a white button). The white labels beneath each of the "ASSIGN" knobs are now active.
3. Without turning the knob, press down on the "ASSIGN 1" knob. In the display you will see the value for the "ATTACK" parameter.
4. Play any note and determine whether the volume increases slowly or immediately. The answer to this question will tell you whether "0" is the fastest or slowest attack setting.
5. Using the ADSR controls for the amplifier, create the following amplitude envelope. When I listen to this voice, it must be obvious that the attack, decay, and release and reasonably slow. Be sure that you also hear a drop in level when you reach the sustain stage.
1. Why? You have made changes to the voice, and they will not be there if you change to another voice and come back.2. Store this voice in location "002". You will not need to rename it. It already has the name we want.
Task: Store the voice "001" to location
"003". Be sure you don't accidentally store it to location "002" or you
will replace the voice in that location!
1. Using the techniques you have already employed, store "BuzzyB" to location "003".
Task: Rename the voice that is now
in location "002".
1. Name the voice in location "003": "VCF EG-Your Initials".
Filter EG Experiment
Task: Create a new EG shape for the
filter
1. Be sure you have voice "003" called up. You should already be there.2. Press the "Knob Parameter Group" button named "VCF" (It's a green button). The green labels to the left of each of the "ASSIGN" knobs are now active.
3. Set the "VCF" EG parameters as follows:
"VCF Cutoff" to "25"
"FEG Depth" to "127"
"Attack" to "85"
"Decay" to "60"
"Sustain" to "45"
"Release" to "0"
4. Play and hold a note and listen to the timbre change.5. On a piece of scratch paper, draw an approximation of the shape of this filter EG.
Task: Save the Voice
1. Save your changes by storing this voice in location "003". You will not need to rename it.
Task: Save your Voices to a Galaxy
Bank
There is not a Galaxy librarian for
the AN1x, so we will be saving the information in a slightly different
way than you saved the Proteus Presets.
1. Boot "Galaxy".2. From the "File" menu select "New Bank".
3. When the menu appears, choose "Bulk Storage".
4. In the title bar of the bank window that appears, select "External". This is how "Galaxy" know the record the information coming from the MTP output #8 (we've named it "External") on the front of the MTP.
5. From the "Load/Send" menu select "Get Bulk Data from Device".
6. Galaxy will just sit there and do nothing. So will the AN1x. You have to tell the AN1x to send the information to Galaxy. Here's how:
a) set the "Edit Rotary Switch" to select the bottom row of the control matrix. You will see the function "BulkDump" on the bottom line.7. This dump will take about a minute to complete and the display will alert you as to when it is done.b) Press to "UP" value button until the following information appears in the display "1-64
vce". The Y/N is flashing.c) Press the "YES/ENTER" button to initiate the dump. You have just told the AN1x to send voices 1-64 to Galaxy.
Task: Save your Galaxy bank to your
2 Macintosh formatted disks.
1. Name your Galaxy Bank: "Your Last Name-Lab 12" and save it to a floppy disk.2. Save it to your backup disk.
3. Ceate a Folder on the disk named "First Initial, Last name - Lab 12"
4. Place the Galaxy bank you just created in the Folder to turn in
To Turn In:
One Macintosh Disk with properly named folder and Galaxy Bank.

